# Klaviyo Email & SMS

{% hint style="warning" %}
With the 2024-11 Shopwaive API release, this feature has been deprecated. For AI-powered email campaigns, refer to Shopwaive's [Send email](https://docs.shopwaive.com/shopify/shopify-flow#send-an-email-when-credit-is-deposited) action in Shopify Flow
{% endhint %}

<figure><img src="/files/D4RgOAJKqboC57EDbpW7" alt=""><figcaption><p>Connect your Klaviyo account to Shopwaive to unlock powerful marketing campaigns</p></figcaption></figure>

## Introduction

**Klaviyo: The Global Leader in Powerful Automation for eCommerce Brands**

Connecting Klaviyo to Shopwaive offers several benefits:

* **Automated Email and SMS Messaging**: Easily set up and design customized email and SMS flows.

### Automatic emails when credit is given

Enable automatic email and SMS notifications for store credit issuance in Shopwaive.

{% hint style="info" %}
Unlock this powerful feature to bulk import customer accounts into Shopwaive. Automatically trigger emails to thousands of customers instantly.
{% endhint %}

{% hint style="success" %}
To enhance your emails, include the customer's account balance and promotional links to your store, encouraging them to redeem their credit. Utilize Shopwaive's credit expiration feature to add a limited-time restriction, motivating quick redemption.
{% endhint %}

### Trigger event-based email or SMS flows

Implement time delays or trigger workflows when a customer's credit balance changes due to adjustments, refunds, purchases, rewards, or milestones.

#### Examples of event-based flows

> Brand A benefits from setting up low balance alerts when a customer's available balance falls below a set threshold after a purchase. They include a 3-day delay in Klaviyo so the email is sent after this period.
>
> Brand B sends account activation emails that include a welcome credit or reward, encouraging customers to register their email and spend their credit.

## Getting Started

Follow the steps below to get connected in just minutes

### Create a Klaviyo account

First, if you don't already have one you'll need to create a [Klaviyo](https://www.klaviyo.com) account and signup for a subscription plan. Klaviyo offers a free plan to try out many of their most powerful tools and flows that you can connect to Shopwaive. In your Klaviyo account you'll manage all your brand assets, email templates, flows, domains, and API keys.

### Enable Flows within Shopwaive

Connect your Klaviyo account to Shopwaive by first enabling Klaviyo flows in Shopwaive, by clicking the left menu item labeled Settings and toggle on Klaviyo flows. If turned on, the badge will read <mark style="color:blue;">**Flows Enabled**</mark>

<figure><img src="/files/wDwr9P6mWHZKqki5uQ3y" alt=""><figcaption><p>Turn on the Klaviyo Flows toggle in the Shopwaive settings page</p></figcaption></figure>

## Setup a dedicated sending domain

To ensure your email notifications have the greatest likelihood of landing in your customers inbox, you'll need to setup a dedicated sending domain and configure your DNS settings.

<figure><img src="/files/60hLC3hXBIkm1W45i1Qm" alt=""><figcaption><p>Domains settings in your Klaviyo account</p></figcaption></figure>

1. Find your account avatar at the bottom left of the page, and visit **Settings** > **Email** > **Domains**
2. Click **Get Started**

<figure><img src="/files/24Qct2zCdUfMRUnu8LP5" alt=""><figcaption><p>Define your dedicated sending domain and root domain</p></figcaption></figure>

Follow the instructions provided by Klaviyo to make updates to your DNS settings, which include adding the CNAME and TXT records provided

<figure><img src="/files/5LwWmc2srqYPiCsVyDcJ" alt=""><figcaption><p>Update your DNS records to match the host and values provided</p></figcaption></figure>

Once your dedicated domain setup is complete and verified, you're ready to start sending emails from your dedicated domain.

## Create a Klaviyo List

Next, create a list in Klaviyo. We'll use this to trigger your flows later on.

<figure><img src="/files/FT3oXMfVNuApP01FUI7s" alt=""><figcaption><p>Create a list by visiting Audience > List &#x26; Segments </p></figcaption></figure>

Navigate to **Audience** > **List & segments** and then click the button <mark style="color:blue;">**Create List / Segment**</mark>

<figure><img src="/files/Hbs0XMs5zJA8crE9IvBQ" alt=""><figcaption><p>Create a list by choosing List when asked which you'd like to create</p></figcaption></figure>

Choose the <mark style="color:blue;">**List**</mark> option.

Next, enter a name for the list, in our example we named it ***Available Balance List*** and then click the <mark style="color:blue;">**Create List**</mark> button to create the list.

<figure><img src="/files/TFJELeAfJXuvc4oBSRzp" alt=""><figcaption><p>Name your list and then click Create List</p></figcaption></figure>

Now click the ellipsis at the right of the list, and select <mark style="color:blue;">**List Settings**</mark>.

<figure><img src="/files/MQWzN4pOhTONy2jRlWDj" alt=""><figcaption><p>Navigate to the dropdown menu of your list and select List Settings</p></figcaption></figure>

1. Keep a copy of your <mark style="color:blue;">**List ID**</mark> as we'll need it later, in our example below it is **R2S5jQ** but you'll need to use your own unique List ID when setting it up.
2. Select the <mark style="color:blue;">**Single opt-in**</mark> option at the bottom of the page and click <mark style="color:blue;">**Update List Settings**</mark>.

<figure><img src="/files/ifzlPaVIb5Dm4HBcO4C3" alt=""><figcaption><p>Find your List ID and select the single opt-in option</p></figcaption></figure>

## Connect Klaviyo to Shopwaive

Connecting Klaviyo to Shopwaive is quick. Follow the steps below to complete the integration

### Save your Klaviyo API key and List ID in Shopwaive

Next, Log into the Shopwaive app from the Shopify Admin. Navigate to the <mark style="color:blue;">**Flows**</mark> tab.&#x20;

<figure><img src="/files/duHpB1AibEyhalt2SEIp" alt=""><figcaption><p>Select the Unspent balance reminder flow</p></figcaption></figure>

Hover over the <mark style="color:blue;">**Unspent balance reminder**</mark> card and click it to create a recurring flow&#x20;

<figure><img src="/files/dOPwYC1Ql1vQsm3MeuGP" alt=""><figcaption><p>Connect Klaviyo List ID to your Shopwaive account</p></figcaption></figure>

In the popup, enter your <mark style="color:blue;">**Klaviyo Private API Key**</mark> and <mark style="color:blue;">**Klaviyo List ID**</mark>

To locate your API Key, in your Klaviyo account visit **Settings** > **Account** > **API keys**

<figure><img src="/files/iS5rZqBXhFUSScRA5dn6" alt=""><figcaption><p>API key can be found in your Klaviyo Account Settings page</p></figcaption></figure>

If you don't already have one, click the <mark style="color:blue;">**Create Private API Key**</mark> button and copy the Private API Key listed. Ensure you copy the Private API key, as we will not be using the Public API Key.&#x20;

Next, paste your Klaviyo <mark style="color:blue;">**Private API Key**</mark> and your <mark style="color:blue;">**List ID**</mark> you created earlier into the two text fields as shown in Shopwaive. Click <mark style="color:blue;">**Save**</mark>

<figure><img src="/files/k1dqp8hILUkNidTQEdn4" alt=""><figcaption><p>Paste in your Klaviyo Private API Key and List ID</p></figcaption></figure>

If successful, you'll receive a success banner that the Klaviyo to Shopwaive connection was made successfully.

If you receive an error or continue to have trouble getting setup, reach out to our team by sending us a message in the in-app chat, we're here to help. Ensure when you paste your key and ID in the text fields that no extra white space is before or after, as this will prevent the connection from succeeding.

### Give store credit to a customer

If you've not already, give customer store credit. Follow these [steps](/shopify/install.md#step-3-give-customer-store-credit) to give credit or on the homepage of the app just search for your customer by email and click <mark style="color:blue;">**Adjust balance**</mark>.&#x20;

{% hint style="info" %}
If you're just getting started and want to test out the Klaviyo flow automation with Shopwaive, then you need to give credit to at least one customer before completing the remaining steps below to connect Klaviyo.&#x20;
{% endhint %}

{% hint style="success" %}
If you'd like you can start with a test credit, such as giving credit to yourself, or an admin or support email address.
{% endhint %}

<figure><img src="/files/eQaaiI6uwsLp5rqaPIwi" alt=""><figcaption><p>Give credit to at least one customer, for example and Admin or support email address</p></figcaption></figure>

Enter an amount, such as $50 or any amount. In the popup, you don't need to check the box labeled <mark style="color:blue;">**Send email**</mark> as this option is for Shopwaive's internal email service that is sent manually to a customer and is not connected to Klaviyo. Just click <mark style="color:blue;">**Save**</mark> instead.

## Create a Klaviyo Flow

Next, navigate to the **Flows** page within your Klaviyo account on the left menu pane. Click <mark style="color:blue;">**Create Flow**</mark>

<figure><img src="/files/AJRfNTQipjkGNAVn1myn" alt=""><figcaption><p>Navigate to the Flows page in your Klaviyo account select Create Flow</p></figcaption></figure>

Select <mark style="color:blue;">**Create From Scratch**</mark>

<figure><img src="/files/B93xB6tsLQhD9tt9Qds2" alt=""><figcaption><p>Select Create From Scratch</p></figcaption></figure>

Enter a name for the flow. In our example below, we named it <mark style="color:blue;">**Available Balance Flow**</mark>

<figure><img src="/files/MbIS20qKG0KlhoD1UmsT" alt=""><figcaption><p>Enter a name for your flow</p></figcaption></figure>

### Create a Trigger with Flow Filters

Create a trigger for your flow by following these steps,

Select <mark style="color:blue;">**Metric**</mark>

<figure><img src="/files/mCTIcEAO9Mh1YfTeKMxI" alt=""><figcaption><p>Select Metric from the list of triggers</p></figcaption></figure>

When asked what action will trigger your flow, Select <mark style="color:blue;">**Subscribed to List**</mark>

<figure><img src="/files/IjDZFQxSTQsuKqUAmwUM" alt=""><figcaption><p>Select the Subscribed to List action</p></figcaption></figure>

Next, Click <mark style="color:blue;">**Flow Filters**</mark> and then <mark style="color:blue;">**Add a Flow Filter**</mark>

<figure><img src="/files/ETMahtrM8xYBuMxg1MZh" alt=""><figcaption><p>Restrict the flow to only certain people</p></figcaption></figure>

For condition, select <mark style="color:blue;">**If someone is in or not in a list**</mark>

<figure><img src="/files/qYyIWJATfe3xL7AK4UQS" alt=""><figcaption><p>Create a flow filter condition to if someone is in or not in a list</p></figcaption></figure>

Select the list you created previously from the drop down menu, in our case <mark style="color:blue;">**Available Balance List**</mark>

<figure><img src="/files/ZshWbN8ezF4GPEWc5VRI" alt=""><figcaption><p>Choose the Available Balance List</p></figcaption></figure>

Click the <mark style="color:blue;">**+ AND**</mark> button to add an additional condition that is to be met before the flow is triggered. Select <mark style="color:blue;">**Properties about someone**</mark> from the drop down menu

<figure><img src="/files/k5CCmlxH10O4LvzgCjcl" alt=""><figcaption><p>Add an additional condition named Properties about someone</p></figcaption></figure>

In the <mark style="color:blue;">**Dimension**</mark> drop down, select the custom property named <mark style="color:blue;">**$shopwaive\_credit**</mark>

<figure><img src="/files/MsKoFaGYsnPckc22mBOv" alt=""><figcaption><p>Select the $shopwaive_credit dimension</p></figcaption></figure>

If new credit is given or adjusted for a customer, we want to send email notifications only to customers with balances greater than $0.00. For example, if credit is revoked or deleted by the store owner for a customer, the default behavior would not trigger an email notification since this flow's intent is promotional and to incentivize spend of a customer's available balance.

<figure><img src="/files/c14hgSFa1lGNXBarAOni" alt=""><figcaption><p>Condition ensures customers balance is greater than 0</p></figcaption></figure>

Select <mark style="color:blue;">**is greater than**</mark> and then enter <mark style="color:blue;">**0**</mark> for the amount. For the <mark style="color:blue;">**Type**</mark>, select <mark style="color:blue;">**Number**</mark>.&#x20;

Next, set the <mark style="color:blue;">**$shopwaive\_action**</mark> property equals <mark style="color:blue;">**created**</mark> or <mark style="color:blue;">**adjusted**</mark>. This ensures the email and SMS flows only trigger when credit is adjusted or created. If the <mark style="color:blue;">**$shopwaive\_action**</mark> is equal to adjusted, then you need to also check if <mark style="color:blue;">**$shopwaive\_previous**</mark> is less than <mark style="color:blue;">**$shopwaive\_credit**</mark>. <mark style="color:blue;">**$shopwaive\_previous**</mark> was the customers balance before the most recent <mark style="color:blue;">**$shopwaive\_action**</mark>.

You can also check <mark style="color:blue;">**$shopwaive\_expirationdate**</mark> and <mark style="color:blue;">**$shopwaive\_expires**</mark> for the account expiration date and expiration boolean string. <mark style="color:blue;">**$shopwaive\_expires**</mark> can equal "true" or "false", if the account is set to expire, this property equals the string "true". If the account does not have an expiration date that is enforced (i.e. such that <mark style="color:blue;">**$shopwaive\_expires**</mark> equals "false"), then the value of <mark style="color:blue;">**$shopwaive\_expirationdate**</mark> does not apply and can be ignored.

<figure><img src="/files/TnsH9JATxgsAf01rawGy" alt=""><figcaption><p>Example Klaviyo response from a user profile request</p></figcaption></figure>

<figure><img src="/files/KdWCeZsZQVlB2mRxrFbF" alt=""><figcaption><p>Flow filters that ensure the flow is only triggered when credit is greater than zero, and has been adjusted or created</p></figcaption></figure>

Now the conditions for the Flow Filters are set, click <mark style="color:blue;">**Save**</mark> and then click <mark style="color:blue;">**Done**</mark> to return to main flow.&#x20;

### Create an Email or SMS action

After the flow is triggered, Klaviyo provides you many options to design your flow's timing and intent. For this example, we'll add an email that is sent when the flow is triggered. You can use Klaviyo's Drag & Drop or HTML Editor and choose from any templates to match your brand and messaging, your options are truly endless.

<figure><img src="/files/HCsaIPgLfsguzPow3Pd4" alt=""><figcaption><p>Drag and drop the Email Action into the flow as shown</p></figcaption></figure>

After you drag and drop the <mark style="color:blue;">**Email**</mark> action into your flow. Click <mark style="color:blue;">**Edit.**</mark>

For simplicity, choose the <mark style="color:blue;">**Drag and Drop**</mark> option to design your email message with the customer's available balance.

<figure><img src="/files/JvYvxBOlLl6is82DKMGm" alt=""><figcaption><p>Click Drag and Drop to create email's using Klaviyo powerful drag-and-drop editor</p></figcaption></figure>

You can choose a Promotional template from the vast array of template options that Klaviyo offers to quickly begin.

<figure><img src="/files/CZKm0GxvNahNSBZDuxfV" alt=""><figcaption><p>Choose an example promotional template from Klaviyo's template library</p></figcaption></figure>

Next, we're going to customize the template to include personalization.

Select the text in the first paragraph beneath the <mark style="color:blue;">**On a summer excursion title**</mark>. This opens a text editor in the left menu pane. Click your mouse in the line of text such that your blinking cursor is between <mark style="color:blue;">Redeem your</mark> and <mark style="color:blue;">our most popular</mark> as shown below.&#x20;

<figure><img src="/files/sOQpyGgizcIUtNPSr0wq" alt=""><figcaption><p>Select the text in the email to add personalization</p></figcaption></figure>

Now, click the Personalization icon shaped like a person at the top of the text editor menu that is labeled <mark style="color:blue;">**Add personalization**</mark> if you hover.

<figure><img src="/files/BZLcUxgAwnlF0JyeSIvu" alt=""><figcaption><p>Add personalization by clicking the personalization icon</p></figcaption></figure>

Scroll down the drop down menu and select <mark style="color:blue;">**$shopwaive\_currency**</mark>&#x20;

<figure><img src="/files/bZcf198mSVPAKXNf4q3h" alt=""><figcaption><p>Select $shopwaive_currency</p></figcaption></figure>

And then repeat the steps by clicking the personalization icon once again, scroll down the menu and select <mark style="color:blue;">**$shopwaive\_credit**</mark>.&#x20;

<figure><img src="/files/xLN0wdLVJg7sqZMYX442" alt=""><figcaption><p>Then select $shopwaive_credit</p></figcaption></figure>

If in the Shopwaive app your store currency is set as USD, then adding these personalization properties in-line of the email will combined the <mark style="color:blue;">**$**</mark> symbol with the credit amount to form the credit balance ("$" plus "50.00" will read $50.00). You can change your currency anytime within the **Shopwaive** > **Settings**.

<figure><img src="/files/FWzgu0vuCdzbOVhQB5EL" alt=""><figcaption><p>Your editor should show personalization after adding Shopwaive currency and credit</p></figcaption></figure>

{% hint style="info" %}
(Optional) Change the CTA call-to-action to incentivize your customers to redeem their credit, for example <mark style="color:blue;">**Redeem Credit**</mark> as shown below
{% endhint %}

<figure><img src="/files/DvVpdisUGJJ2rvWyQDP2" alt=""><figcaption><p>Customize the CTA call-to-action, or create A/B Testing to monitor CTA's that convert</p></figcaption></figure>

Copy the personalization text by highlighting and copying it as we will use this in our Subject title. To edit the Subject title, click the <mark style="color:blue;">**Save & exit**</mark> button.

<figure><img src="/files/fvDZ5WIoke1LsZDQlSU9" alt=""><figcaption><p>Copy the personalization text in the email template to use in the Subject title</p></figcaption></figure>

You can personalize the Subject line and Preview text as you wish. You can add the customer's available balance by pasting in the personalization snippets from the email template in the previous step.

<figure><img src="/files/FyLfBVfC2AgCt5gmMMyF" alt=""><figcaption><p>Enter "Redeem your " and then paste your personalization into the subject line</p></figcaption></figure>

Next, click <mark style="color:blue;">**Edit Email**</mark> once more and then <mark style="color:blue;">**Preview & test**</mark>.

You can send a test email to the email address you issued $50 in the previous steps by clicking <mark style="color:blue;">**Send Test**</mark> and enter in the same email address you issued credit, then click <mark style="color:blue;">**Send**</mark>

<figure><img src="/files/oOk2HoVS4Hhzom0g4ij3" alt=""><figcaption><p>Click Send Test and enter your test email address that you issued credit to in the earlier steps</p></figcaption></figure>

The test will send the email and the customer's balance will be reflected in the Subject title and message. Get creative, and design your flows, email templates, CTAs, messaging and customer journey any way you choose to perfectly match your brands goals and objectives. The opportunity with Klaviyo and Shopwaive is enormous.

<figure><img src="/files/923b0fKRaCA3WTYeMc6I" alt=""><figcaption><p>Email received to customer with personalization, including Shopwaive credit balance and CTA</p></figcaption></figure>

## Choose your Smart Sending preference

Return to your Flow and select the <mark style="color:blue;">**Email**</mark> action.&#x20;

<figure><img src="/files/3TXaNdMR5vytsplNgpJ5" alt=""><figcaption><p>Note the green email icon in the Email action. Also note the Smart Sending option is ON</p></figcaption></figure>

By default, <mark style="color:blue;">**Email**</mark> actions have a setting named <mark style="color:blue;">**Smart Sending**</mark> turned ON. This prevents emails from sending to customers if they recently received an email. If you turn this OFF and Flows are connected and enabled in Shopwaive and Klaviyo, then emails will send every time a customers credit changes. If you prefer, you can turn <mark style="color:blue;">**Smart Sending**</mark> ON to prevent same-day emails, however, it should be noted if this is turned ON your customers will not automatically receive email alerts to changes in their available balance if multiple updates are made too frequently.

## Select Recurring options

After creating your primary flow using the steps above, you have two different options for designing the flow to recur on a set frequency.&#x20;

### Option 1: Using Klaviyo time delays with email cloning

The first option enables your primary flow to recur by adding time delays and cloning your existing email message. If you desire, after cloning the email or SMS message within the primary flow, you can make changes to each consecutive clone to show your customers a unique email design or perhaps one that aligns with seasons, holidays, or other calendar events. Though the design can be different, the goal and content of the email is the same. Each email or SMS will show the customers' available balance and a backlink to your site to redeem. For Option 1, only the primary flow exists and multiple emails within it are clones to create the recurring effect.

### Select Klaviyo Recurring Options — Step-by-step:

After your first email message, add a time delay. For quarterly reminders, we set the first delay to 90 days. You can set this frequency to any length of time.

<figure><img src="/files/hV6FXZyk9Zb5a7qrSDXq" alt=""><figcaption><p>90-day time delay is added after your Available balance email</p></figcaption></figure>

The Available Balance email is cloned by selecting the ellipsis to open the drop-down menu

<figure><img src="/files/ZtewnuV6XcHnyCgp6eCF" alt=""><figcaption><p>Select the ellipsis of the Available Balance email and select Clone</p></figcaption></figure>

Drag-and-drop the Available Balance clone after the 90-day delay. Also, change from <mark style="color:yellow;">**Manual**</mark> to <mark style="color:green;">**Live**</mark>

<figure><img src="/files/nxxgZIse2a5nexBGUwXg" alt=""><figcaption><p>Clone the email and place it after the delay</p></figcaption></figure>

Now, you can choose to open the email clone "Copy of Available Balance" to make edits or changes to the design, but is not required. The current available balance of the customer at the time the Copy/clone is sent 90 days after the first email will be accomplished. You can repeat the use of Time delays and email/SMS clones using this process as many times as you like.

### Option 2: Using Date-Property Triggered flows with saved email templates

To create a date-property triggered flow based on the primary flow using saved email templates, we need to save the email we created in our primary flow as a template. We do this because when we create a new flow that recurs at a frequency, it will save time.

### Save your email as a template <a href="#h_01h9q8q4ktar278ahh02wk87h8" id="h_01h9q8q4ktar278ahh02wk87h8"></a>

To change a list-triggered flow to an event-triggered flow, or vice versa, you cannot simply clone the flow. Instead, you'll have to create a brand new flow. You can speed up this process, however, by first saving all the flow emails as templates (we only have 1 in the primary Available Balance flow) so they can be added into your new flow with a few clicks.

In our example, we're going to change a list-triggered flow to an event-triggered flow. Here are the steps to follow:

1. Open the flow builder for your list-triggered flow.
2. Next, [save all the emails as templates](https://help.klaviyo.com/hc/en-us/articles/115000102752#save-an-email-as-a-template). It is helpful to name these templates something clear so you can find them easily when you make your new flow.\
   ![Clicking the arrow next to the Edit Details button on Message Content screen for a flow email will show the Save as Template option.](https://help.klaviyo.com/hc/article_attachments/18583431540763)
3. Once you've saved all the emails associated with the flow, create a new flow by navigating back to the **Flows** tab.
4. When you are building out the content for your new flow, find your previously saved templates by choosing **Drag and Drop** and then **Saved templates** when editing a flow message.\
   ![The Drag and Drop option when editing an email.](https://help.klaviyo.com/hc/article_attachments/18583530935579)\
   ![The Saved templates tab after selecting Drag and Drop.](https://help.klaviyo.com/hc/article_attachments/18583416468635)
5. Once you've done this the email in the primary Available Balance flow, you can create a new flow with a Date-Property trigger

## Create a recurring date-based flow

The primary Available Balance flow created earlier adds customers with Shopwaive credit balance to a list. We can recur messaging to customers on that list using a separate date-based triggered flow.

To create a date property-triggered flow:

1. Navigate to the **Flows** tab.
2. Click **Create Flow**. This will take you to the Flows Library where you can find pre-built birthday and anniversary flows.&#x20;
3. Either select a pre-built flow or create one from scratch. To build it yourself, click **Create from Scratch** and choose the **Date Property** option as the initial trigger.

<figure><img src="/files/Uee2zfjsYE4oAc4ZShCR" alt=""><figcaption><p>Select Create From Scratch and name the recurring flow</p></figcaption></figure>

Select the **Date Property** as a trigger

<figure><img src="https://help.klaviyo.com/hc/article_attachments/5918703799323/mceclip0__9_.jpg" alt="" width="375"><figcaption><p>
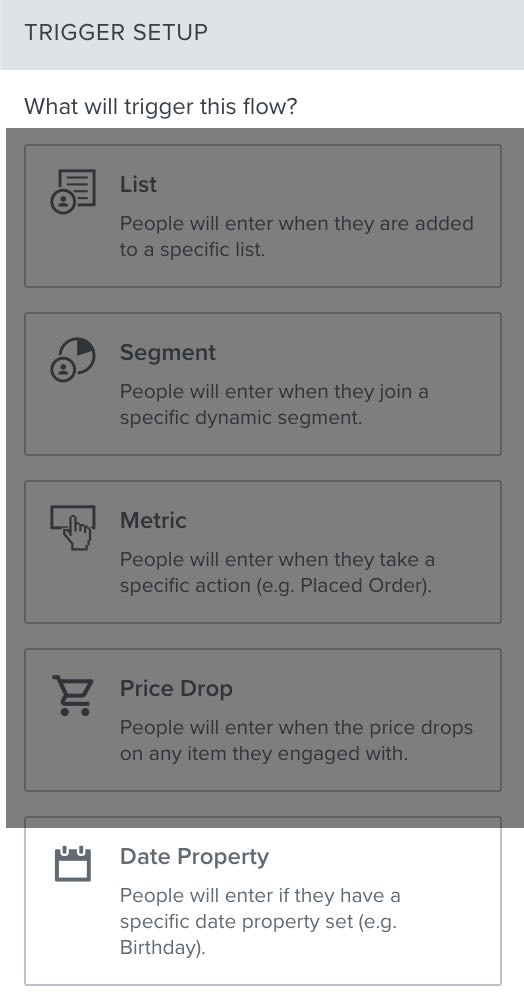
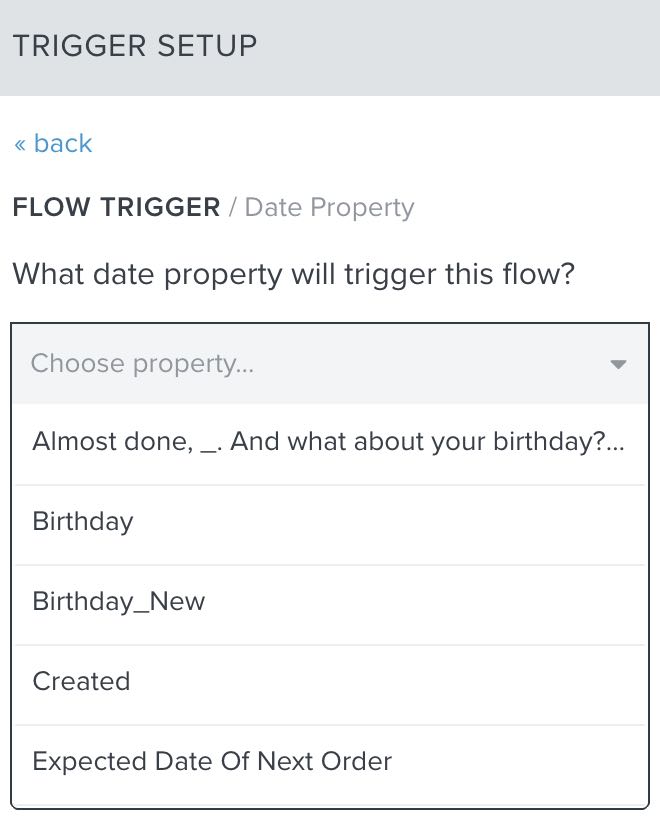
Choose Date Property for trigger</p></figcaption></figure>

When you first choose the date property trigger, you will be prompted to select which specific property you would like to trigger the flow. All date-based profile properties in your account will appear in the dropdown menu for selection. We will chose the **Created** profile property since this is the date the customer was first created when they Subscribed to the Available Balance list (customers are automatically subscribed when you turn on the Klaviyo Flows in the Shopwaive app)

<img src="https://help.klaviyo.com/hc/article_attachments/5918727432731/image4__3_.jpg" alt="When configuring the date property trigger, there is a dropdown where you can choose from the different date properties in your account. For this recurring flow we will choose the Created property" height="384" width="307">

## Pick when the flow will start and frequency <a href="#pick-when-the-flow-will-start3" id="pick-when-the-flow-will-start3"></a>

After selecting the **Created** date-based profile property, you will need to choose when the flow should start: on or before the actual date. For this example, we will choose **On person's** **Created** date and choose **Monthly** for the flow repeat frequency.&#x20;

### Frequency options for recurring flows  <a href="#choose-how-often-the-flow-will-repeat4" id="choose-how-often-the-flow-will-repeat4"></a>

* **Monthly**\
  Recipients will qualify to enter this flow on a monthly recurring basis on the same day each month; for example, a monthly credit balance alert series. Note that if you schedule this on the 31st, it will automatically pick up on the last day of the month for any month that has fewer than 31 days.
* **Yearly**\
  Recipients will qualify to enter this flow on a yearly recurring basis on the same month/day; for example, a yearly anniversary or birthday series.
* **Should not repeat**\
  Recipients will qualify to enter this flow only once when the full date matches (day, month, and year); for example, a wedding or pregnancy due date

For this example, and as mentioned above, we will choose **Monthly**. Your flow settings should look similar to the screenshot below:

<figure><img src="/files/3qhLA6B5wrARXN5HOg5s" alt=""><figcaption><p>Select Monthly frequency to repeat the flow each month</p></figcaption></figure>

## Drag in the saved email templates or SMS messages <a href="#choose-how-often-the-flow-will-repeat4" id="choose-how-often-the-flow-will-repeat4"></a>

The email templates we saved earlier can now be dragged into this new flow, and edited as desired. After clicking **Save** in the Trigger and Flow Filters section, drag a blank Email and set it after the **Created** trigger. To update the blank Email to a Saved Email Template, use Step 4. from the [Save your email as a template](#h_01h9q8q4ktar278ahh02wk87h8) section above.

<figure><img src="/files/REYvkusUg5eFVwG1pAjR" alt=""><figcaption><p>Select Configure Content and add the Saved Email Template from earlier</p></figcaption></figure>

### Add Additional Filters to the Email <a href="#add-flow-filters5" id="add-flow-filters5"></a>

Now that we've setup a recurring flow based on a date trigger, we will limit the email to only be sent to customers that have an available balance. Select the **Email** we just created from the Available Balance template and under **Settings**, click the **Additional Filters** link.

<figure><img src="/files/Hjgbq6TxARcjYzsGuw28" alt=""><figcaption><p>Select Additional Filters under Settings on the left menu pane to setup a flow filter based on customers available balance</p></figcaption></figure>

For flow filters, choose **Properties about someone** and choose the customer **$shopwaive\_credit** property and then select **is greater than** and then type in **0**. If you want to increase this available balance threshold to further limit emails sent to only customers with at least a $50 balance, for example, you can type in 50.

<figure><img src="/files/2nYZhZzktRaP0x6nC5yB" alt=""><figcaption><p>Choose the $shopwaive_credit property and select greater than 0. Type is set as Number. Click Save</p></figcaption></figure>

Your final flow settings should look similar to below:

<figure><img src="/files/GIyV56Zh0BT9EORv12fJ" alt=""><figcaption><p>Recurring available balance flow that repeats monthly</p></figcaption></figure>

Your final email settings within the recurring flow should look similar to the screenshot below. Ensure the email status is changed to <mark style="color:green;">**Live**</mark> and that **Smart Sending** is turned off if you wish Klaviyo not place filters on how often your customers receive notifications.

<figure><img src="/files/Z4l8JnfE4yzd3CLyvrDY" alt=""><figcaption><p>Email settings within the recurring flow</p></figcaption></figure>

The primary Available Balance flow created in [Create a Klaviyo Flow](#create-a-klaviyo-flow) is used to initialize and sync customer profiles and available balance data between Shopwaive and Klaviyo. Customer data remains synced between Klaviyo and Shopwaive so as long as you enable the integration feature within Shopwaive Settings. The recurring flow created using these instructions ([Option 2](#option-2-using-date-property-triggered-flows-with-saved-email-templates)) will successfully send monthly reminder emails to customers that have a credit balance.&#x20;

{% hint style="info" %}
For Option 2, the primary flow is not cloned. Instead, we saved the email templates from the primary flow so we could drag those in to this new flow, to use a quick starting point. Using this option, recurring email or SMS notifications are sent using a date-property trigger that recurs at a frequency you defined.
{% endhint %}

## Choose Gmail Promotion settings

{% hint style="info" %}
(Optional) If you or your customer's use Gmail, you may find available balance emails sent from Klaviyo arrive in the <mark style="color:blue;">**Promotions**</mark> inbox. Use the steps below to tell Gmail to send to your <mark style="color:blue;">**Primary**</mark> inbox, if you prefer.
{% endhint %}

By default, Gmail may automatically send balance alerts to the Promotions tab. To prevent the alerts from being categorize in the <mark style="color:blue;">**Promotion**</mark> category and to send directly to your customer's <mark style="color:blue;">**Primary**</mark> inbox, you can ask your customer's to drag the email from the Promotions tab into the Primary inbox. A small window will appear at the bottom of the page and you can tell Gmail to do categorize this email in the <mark style="color:blue;">**Primary**</mark> inbox for now on.&#x20;

## Conclusions

Congratulations! Today you setup Klaviyo's powerful email services to seamlessly integrate with Shopwaive's leading credit accounting platform. If you have any questions, just send us a message in the chat, we're here to help.


---

# Agent Instructions: Querying This Documentation

If you need additional information that is not directly available in this page, you can query the documentation dynamically by asking a question.

Perform an HTTP GET request on the current page URL with the `ask` query parameter:

```
GET https://docs.shopwaive.com/shopify/email-and-campaigns/klaviyo-email-and-sms.md?ask=<question>
```

The question should be specific, self-contained, and written in natural language.
The response will contain a direct answer to the question and relevant excerpts and sources from the documentation.

Use this mechanism when the answer is not explicitly present in the current page, you need clarification or additional context, or you want to retrieve related documentation sections.
